防火墙
网络配置
首先假设如下 IP 地址:
- 物理真机:192.168.10.1/24
- 服务器:192.168.10.10/24
- 客户端 A:192.168.10.20/24
- 客户端 B:192.168.10.30/24
24 表示 24 个 1,也就是 255.255.255.0 虚拟机中,仅主机模式对应的是vmnet1网卡,NAT对应的是vmnet8网卡
配置虚拟机网卡
在虚拟机中配置网卡
>>> vim /etc/sysconfig/network-scripts/ifcfg-eno16777728
TYPE=Ethernet
# none 表示默认,还有 dhcp 和 static
BOOTPROTO=none
DEFROUTE=yes
IPV4_FAILURE_FATAL=no
IPV6INIT=yes
IPV6_AUTOCONF=yes
IPV6_DEFROUTE=yes
IPV6_FAILURE_FATAL=no
NAME=eno16777736
UUID=ec77579b-2ced-481f-9c09-f562b321e268
# 关键参数,重启后网卡是否开启
ONBOOT=yes
IPADDR0=192.168.10.10
HWADDR=00:0C:29:C4:A4:09
#NETMASK=255.255.255.0
PREFIX0=24
IPV6_PEERDNS=yes
IPV6_PEERROUTES=yes

>>> systemctl restart network
防火墙管理工具
在公网与内网之间充当保护屏障的防火墙主要功能都是依据策略对穿越防火墙的流量进行过滤,若流量与某一条策略规则相匹配,则执行相应的处理,反之则丢弃。
在 RHEL 7 系统中,firewalld 防火墙取代了 iptables 防火墙。其实,iptables 与 firewalld 都不是真正的防火墙,它们都只是用来定义防火墙策略的防火墙管理工具而已,或者说,它们只是一种服务。iptables 服务会把配置好的防火墙策略交由内核层面的 netfilter 网络过滤器来处理,而 firewalld 服务则是把配置好的防火墙策略交由内核层面的 nftables 包过滤框架来处理。换句话说,当前在 Linux 系统中其实存在多个防火墙管理工具,旨在方便运维人员管理 Linux 系统中的防火墙策略。
Iptables
尽管新型的 firewalld 防火墙管理服务已经被投入使用多年,但是大量的企业在生产环境中依然出于各种原因而继续使用 iptables。考虑到 iptables 在当前生产环境中还具有顽强的生命力,还是需要了解 Iptables 这项技术。
策略与规则链
防火墙从上至下读取策略规则,找到匹配项就去执行定义的行为(放行或阻止)。如果读完策略规则没有匹配到,就执行默认策略。一般默认{策略规则就是两种:
- 放行
- 阻止
iptables 把处理或过滤流量的策略称为规则,多条规则组成一个规则链,根据数据包处理位置的不同,iptables 的规则链分类如下:
| 类别 | 处理位置 |
|---|---|
| pro-routing | 在进行路由选择前处理数据包 |
| input | 处理流入的数据包 |
| output | 处理流出的数据包 |
| forward | 处理转发的数据包 |
| post-routing | 在进行路由选择后处理数据包 |
使用最多的是 input 规则链,以防外网入侵。
iptables 通过策略规则匹配到了流量数据包后,还需要明确相应动作来处理。iptables 设定好的动作如下:
| 动作 | 说明 |
|---|---|
| accept | 允许流量通过 |
| reject | 拒绝通过,丢弃后回复(明确不要) |
| log | 记录日志信息 |
| drop | 拒绝通过,直接丢弃不响应(假装不在) |
drop 与 reject 的区别
# 防火墙策略为 REJECT
>>> ping -c 4 192.168.10.10
PING 192.168.10.10 (192.168.10.10) 56(84) bytes of data.
From 192.168.10.10 icmp_seq=1 Destination Port Unreachable
From 192.168.10.10 icmp_seq=2 Destination Port Unreachable
From 192.168.10.10 icmp_seq=3 Destination Port Unreachable
From 192.168.10.10 icmp_seq=4 Destination Port Unreachable
--- 192.168.10.10 ping statistics ---
4 packets transmitted, 0 received, +4 errors, 100% packet loss, time 3002ms

# 策略为 DROP
>>> ping -c 4 192.168.10.10
PING 192.168.10.10 (192.168.10.10) 56(84) bytes of data.

--- 192.168.10.10 ping statistics ---
4 packets transmitted, 0 received, 100% packet loss, time 3000ms
基本的命令参数
iptables 根据流量的源地址、目的地址、传输协议、服务类型等信息进行匹配。匹配成功后,根据策略规则所预设的动作来处理这些流量。
常用的参数以及作用
| 参数 | 作用 |
|---|---|
| -P | 设置默认策略 |
| -F | 清空规则链 |
| -L | 查看规则链 |
| -A | 在规则链的末尾加入新规则 |
| -I num | 在规则链的头部加入新规则 |
| -D num | 删除某一条规则 |
| -s | 匹配来源地址 IP/MASK,加叹号“!”表示除这个 IP 外 |
| -d | 匹配目标地址 |
| -i 网卡名称 | 匹配从这块网卡流入的数据 |
| -o 网卡名称 | 匹配从这块网卡流出的数据 |
| -p | 匹配协议,如 TCP、UDP、ICMP |
| –dport num | 匹配目标端口号 |
| –sport num | 匹配来源端口号 |
示例
参数查看已有的防火墙规则链
>>> iptables -L
Chain INPUT (policy ACCEPT)
target prot opt source destination
ACCEPT all -- anywhere anywhere ctstate RELATED,ESTABLISHED
ACCEPT all -- anywhere anywhere
INPUT_direct all -- anywhere anywhere
INPUT_ZONES_SOURCE all -- anywhere anywhere
INPUT_ZONES all -- anywhere anywhere
ACCEPT icmp -- anywhere anywhere
REJECT all -- anywhere anywhere reject-with icmp-host-prohibited
清空已有的防火墙规则链
>>> iptables -F
>>> iptables -L
Chain INPUT (policy ACCEPT)
target prot opt source destination
... ...
把 INPUT 规则链的默认策略设置为拒绝
>>> iptables -P INPUT DROP
>>> iptables -L
Chain INPUT (policy DROP)
target prot opt source destination
... ...
默认策略拒绝动作只能是 DROP,而不能是 REJECT
向 INPUT 链中添加允许 ICMP 流量进入的策略规则
而向防火墙的 INPUT 规则链中添加一条允许 ICMP 流量进入的策略规则就默认允许了这种 ping 命令检测行为。
>>> iptables -I INPUT -p icmp -j ACCEPT
>>> ping -c 4 192.168.10.10
PING 192.168.10.10 (192.168.10.10) 56(84) bytes of data.
64 bytes from 192.168.10.10: icmp_seq=1 ttl=64 time=0.156 ms
64 bytes from 192.168.10.10: icmp_seq=2 ttl=64 time=0.117 ms
64 bytes from 192.168.10.10: icmp_seq=3 ttl=64 time=0.099 ms
64 bytes from 192.168.10.10: icmp_seq=4 ttl=64 time=0.090 ms
--- 192.168.10.10 ping statistics ---
4 packets transmitted, 4 received, 0% packet loss, time 2999ms
rtt min/avg/max/mdev = 0.090/0.115/0.156/0.027 ms
默认策略为允许,但不允许 ICMP
删除 INPUT 中允许 ICMP 流量规则,并把默认策略设置为允许
>>> iptables -D INPUT 1
>>> iptables -P INPUT ACCEPT
>>> iptables -L
Chain INPUT (policy ACCEPT)
target prot opt source destination
... ...
只允许指定网段访问
设置 INPUT 规则链只允许指定网段的主机访问本机的 22 端口,拒绝来自其他所有主机的流量:
>>> iptables -I INPUT -s 192.168.10.0/24 -p tcp --dport 22 -j ACCEPT
>>> iptables -A INPUT -p tcp --dport 22 -j REJECT
>>> iptables -L
Chain INPUT (policy ACCEPT)
target prot opt source destination
ACCEPT tcp -- 192.168.10.0/24 anywhere tcp dpt:ssh
REJECT tcp -- anywhere anywhere tcp dpt:ssh reject-with icmp-port-unreachable
... ...
因为防火墙策略规则是按照从上到下的顺序匹配的,所以要把允许动作放到拒绝动作前面,否则所有的流量就将被拒绝掉
效果如下:
-
指定网段访问
使用 IP 地址在 192.168.10.0/24 网段内的主机访问服务器(即前面提到的设置了 INPUT 规则链的主机)的 22 端口,效果如下:
>>> ssh 192.168.10.10 The authenticity of host '192.168.10.10 (192.168.10.10)' can't be established. ECDSA key fingerprint is 70:3b:5d:37:96:7b:2e:a5:28:0d:7e:dc:47:6a:fe:5c. Are you sure you want to continue connecting (yes/no)? yes Warning: Permanently added '192.168.10.10' (ECDSA) to the list of known hosts. Last login: Sun Feb 12 01:50:25 2017 -
网段外访问
>>> ssh 192.168.10.10
Connecting to 192.168.10.10:22...
Could not connect to '192.168.10.10' (port 22): Connection failed.
拒绝所有人访问本机 12345 端口
>>> iptables -I INPUT -p tcp --dport 12345 -j REJECT
>>> iptables -I INPUT -p udp --dport 12345 -j REJECT
>>> iptables -L
Chain INPUT (policy ACCEPT)
target prot opt source destination
REJECT udp -- anywhere anywhere udp dpt:italk reject-with icmp-port-unreachable
REJECT tcp -- anywhere anywhere tcp dpt:italk reject-with icmp-port-unreachable
ACCEPT tcp -- 192.168.10.0/24 anywhere tcp dpt:ssh
REJECT tcp -- anywhere anywhere tcp dpt:ssh reject-with icmp-port-unreachable
... ...
拒绝所有主机访问 1000~1024 端口
>>> iptables -A INPUT -p tcp --dport 1000:1024 -j REJECT
>>> iptables -A INPUT -p udp --dport 1000:1024 -j REJECT
>>> iptables -L
Chain INPUT (policy ACCEPT)
target prot opt source destination
REJECT tcp -- 192.168.10.5 anywhere tcp dpt:http reject-with icmp-port-unreachable
REJECT udp -- anywhere anywhere udp dpt:italk reject-with icmp-port-unreachable
REJECT tcp -- anywhere anywhere tcp dpt:italk reject-with icmp-port-unreachable
ACCEPT tcp -- 192.168.10.0/24 anywhere tcp dpt:ssh
REJECT tcp -- anywhere anywhere tcp dpt:ssh reject-with icmp-port-unreachable
REJECT tcp -- anywhere anywhere tcp dpts:cadlock2:1024 reject-with icmp-port-unreachable
REJECT udp -- anywhere anywhere udp dpts:cadlock2:1024 reject-with icmp-port-unreachable
... ...
注意保存指令
使用 iptables 命令配置的防火墙规则默认会在系统下一次重启时失效,如果想让配置的防火墙策略永久生效,还要执行保存命令
>>> service iptables save
iptables: Saving firewall rules to /etc/sysconfig/iptables: [ OK ]
Firewalld
firewalld(Dynamic Firewall Manager of Linux systems,Linux 系统的动态防火墙管理器)服务是默认的防火墙配置管理工具,它拥有基于 CLI(命令行界面)和基于 GUI(图形用户界面)的两种管理方式
firewalld 支持动态更新技术并加入了区域(zone)的概念。简单来说,firewalld 预先准备了几套防火墙策略集合(策略模板),用户可以根据生产场景的不同而选择合适的策略集合,从而实现防火墙策略之间的快速切换。
常用的区域名称及策略规则
| 区域 | 默认规则策略 |
|---|---|
| trusted | 允许所有的数据包 |
| home | 拒绝流入的流量,除非与流出的流量相关;</br>而如果流量与 ssh、mdns、ipp-client、amba-client 与 dhcpv6-client 服务相关,则允许流量 |
| internal | 等同于 home 区域 |
| work | 拒绝流入的流量,除非与流出的流量相关;</br>而如果流量与 ssh、ipp-client 与 dhcpv6-client 服务相关,则允许流量 |
| public | 拒绝流入的流量,除非与流出的流量相关;</br>而如果流量与 ssh、dhcpv6-client 服务相关,则允许流量 |
| external | 拒绝流入的流量,除非与流出的流量相关;</br>而如果流量与 ssh 服务相关,则允许流量 |
| dmz | 拒绝流入的流量,除非与流出的流量相关;</br>而如果流量与 ssh 服务相关,则允许流量 |
| block | 拒绝流入的流量,除非与流出的流量相关 |
| drop | 拒绝流入的流量,除非与流出的流量相关 |
终端管理工具 firewall-cmd
firewall-cmd 是firewalld防火墙配置管理工具的命令行版本,它的参数都是长格式的全称。
| 参数 | 作用 |
|---|---|
| –get-default-zone | 查询默认的区域名称 |
| –set-default-zone=<区域名称> | 设置默认的区域,使其永久生效 |
| –get-zones | 显示可用的区域 |
| –get-services | 显示预先定义的服务 |
| –get-active-zones | 显示当前正在使用的区域与网卡名称 |
| –add-source= | 将源自此 IP 或子网的流量导向指定的区域 |
| –remove-source= | 不再将源自此 IP 或子网的流量导向某个指定区域 |
| –add-interface=<网卡名称> | 将源自该网卡的所有流量都导向某个指定区域 |
| –change-interface=<网卡名称> | 将某个网卡与区域进行关联 |
| –list-all | 显示当前区域的网卡配置参数、资源、端口以及服务等信息 |
| –list-all-zones | 显示所有区域的网卡配置参数、资源、端口以及服务等信息 |
| –add-service=<服务名> | 设置默认区域允许该服务的流量 |
| –add-port=<端口号/协议> | 设置默认区域允许该端口的流量 |
| –remove-service=<服务名> | 设置默认区域不再允许该服务的流量 |
| –remove-port=<端口号/协议> | 设置默认区域不再允许该端口的流量 |
| –reload | 让“永久生效”的配置规则立即生效,并覆盖当前的配置规则 |
| –panic-on | 开启应急状况模式 |
| –panic-off | 关闭应急状况模式 |
用 firewalld 配置的防火墙策略默认为运行时(Runtime)模式,随着系统的重启会失效。如果想让配置策略一直存在,就需要使用永久(Permanent)模式了,方法就是在用 firewall-cmd 命令正常设置防火墙策略时添加–permanent 参数,这样配置的防火墙策略就可以永久生效了 但用它设置的策略只有在系统重启之后才能自动生效。如果想让配置的策略立即生效,需要执行 firewall-cmd –reload 命令。
实例
查看 firewalld 服务当前所使用的区域
>>> firewall-cmd --get-default-zone
public
查询网卡在 firewalld 服务中的区域
>>> firewall-cmd --get-zone-of-interface=eno16777728
public
网卡的默认区域修改为 external
>>> firewall-cmd --permanent --zone=external --change-interface=eno16777728
success
# 查看当前与永久模式下区域名称
>>> firewall-cmd --get-zone-of-interface=eno16777728
public
>>> firewall-cmd --permanent --get-zone-of-interface=eno16777728
external
把 firewalld 服务的当前默认区域设置为 public
>>> firewall-cmd --set-default-zone=public
success
>>> firewall-cmd --get-default-zone
public
启动/关闭急状况模式
启动/关闭 firewalld 防火墙服务的应急状况模式,阻断一切网络连接(当远程控制服务器时请慎用):
>>> firewall-cmd --panic-on
success
>>> firewall-cmd --panic-off
success
查询是否允许请求 SSH 和 HTTPS 协议的流量
查询 public 区域是否允许请求 SSH 和 HTTPS 协议的流量
>>> firewall-cmd --zone=public --query-service=ssh
yes

>>> firewal-cmd --zone=public --query-service=https
no
请求 HTTPS 协议的流量设置为永久允许
把 firewalld 服务中请求 HTTPS 协议的流量设置为永久允许,并立即生效:
>>> firewall-cmd --zone=public --add-service=https
success
>>> firewall-cmd --permanent --zone=public --add-service=https
success
>>> firewall-cmd --reload
success
请求 HTTP 协议的流量设置为永久拒绝
把 firewalld 服务中请求 HTTP 协议的流量设置为永久拒绝,并立即生效:
>>> firewall-cmd --zone=public --permanent --remove-service=http
success
>>> firewall-cmd --reload
success
访问 8080 和 8081 端口的流量策略设置为允许
把在 firewalld 服务中访问 8080 和 8081 端口的流量策略设置为允许,但仅限当前生效:
>>> firewall-cmd --zone=public --add-port=8080-8081/tcp
success
>>> firewall-cmd --zone=public --list-ports
8080-8081/tcp
把访问 888 端口的流量转发到 22 端口
把原本访问本机 888 端口的流量转发到 22 端口,要且求当前和长期均有效:
>>> firewall-cmd --permanent --zone=public --add-forward-port=port=888:proto=tcp:toport=22:toaddr=192.168.10.10
success
>>> firewall-cmd --reload
success
流量转发命令格式为 firewall-cmd –permanent –zone=<区域> --add-forward-port=port=<源端口号>:proto=<协议>:toport=<目标端口号>:toaddr=<目标 IP="" 地址="">
在客户端使用 ssh 命令尝试访问 192.168.10.10 主机的 888 端口:
>>> ssh -p 888 192.168.10.10
he authenticity of host '[192.168.10.10]:888 ([192.168.10.10]:888)' can't be established.
ECDSA key fingerprint is b8:25:88:89:5c:05:b6:dd:ef:76:63:ff:1a:54:02:1a.
Are you sure you want to continue connecting (yes/no)? yes
Warning: Permanently added '[192.168.10.10]:888' (ECDSA) to the list of known hosts.
root@192.168.10.10's password:此处输入远程root管理员的密码
Last login: Sun Jul 19 21:43:48 2017 from 192.168.10.10
拒绝网段的所有用户访问本机的 ssh 服务
富规则表示更细致、更详细的防火墙策略配置,它可以针对系统服务、端口号、源地址和目标地址等诸多信息进行更有针对性的策略配置。它的优先级在所有的防火墙策略中也是最高的。
我们可以在 firewalld 服务中配置一条富规则,使其拒绝 192.168.10.0/24 网段的所有用户访问本机的 ssh 服务(22 端口):
>>> firewall-cmd --permanent --zone=public --add-rich-rule="rule family="ipv4" source address="192.168.10.0/24" service name="ssh" reject"
success
>>> firewall-cmd --reload
success
在客户端使用 ssh 命令尝试访问 192.168.10.10 主机的 ssh 服务(22 端口):
>>> ssh 192.168.10.10
Connecting to 192.168.10.10:22...
Could not connect to '192.168.10.10' (port 22): Connection failed.
图形管理工具 firewall-config
在使用 firewall-config 工具配置完防火墙策略之后,无须进行二次确认,因为只要有修改内容,它就自动进行保存。
配置完毕之后,还需要在 Options 菜单中单击 Reload Firewalld 命令,让配置的防火墙策略立即生效。与命令行中执行–reload 参数的效果一样。
SNAT
SNAT(Source Network Address Translation,源网络地址转换)技术。SNAT 是一种为了解决 IP 地址匮乏而设计的技术,它可以使得多个内网中的用户通过同一个外网 IP 接入 Internet。
服务的访问控制列表
TCP Wrappers 是 RHEL 7 系统中默认启用的一款流量监控程序,它能够根据来访主机的地址与本机的目标服务程序作出允许或拒绝的操作。换句话说,Linux 系统中其实有两个层面的防火墙,第一种是前面讲到的基于 TCP/IP 协议的流量过滤工具,而 TCP Wrappers 服务则是能允许或禁止 Linux 系统提供服务的防火墙,从而在更高层面保护了 Linux 系统的安全运行。
TCP Wrappers 服务的防火墙策略由两个允许和拒绝控制列表文件所控制,允许控制列表放行对服务的请求流量,拒绝控制列表阻止对服务的请求流量。
控制列表文件修改后会立即生效,系统将会先检查允许控制列表文件(/etc/hosts.allow),如果匹配到相应的允许策略则放行流量;如果没有匹配,则去进一步匹配拒绝控制列表文件(/etc/hosts.deny),若找到匹配项则拒绝该流量。如果这两个文件全都没有匹配到,则默认放行流量。
常用参数
| 客户端类型 | 示例 | 满足示例的客户端列表 |
|---|---|---|
| 单一主机 | 192.168.10.10 | IP 地址为 192.168.10.10 的主机 |
| 指定网段 | 192.168.10. | IP 段为 192.168.10.0/24 的主机 |
| 指定网段 | 192.168.10.0/255.255.255.0 | IP 段为 192.168.10.0/24 的主机 |
| 指定 DNS 后缀 | .linuxprobe.com | 所有 DNS 后缀为.linuxprobe.com 的主机 |
| 指定主机名称 | www.linuxprobe.com | 主机名称为 www.linuxprobe.com 的主机 |
| 指定所有客户端 | ALL | 所有主机全部包括在内 |
配置原则
- 编写拒绝策略规则时,填写的是服务名称,而非协议名称
- 建议先编写拒绝策略规则,再编写允许策略规则,以便直观地看到相应的效果
访问控制列表示例
禁止访问本机 sshd 服务的所有流量
禁止访问本机 sshd 服务的所有流量(无须/etc/hosts.deny 文件中修改原有的注释信息):
>>> vim /etc/hosts.deny
#
# hosts.deny This file contains access rules which are used to
# deny connections to network services that either use
# the tcp_wrappers library or that have been
# started through a tcp_wrappers-enabled xinetd.
#
# The rules in this file can also be set up in
# /etc/hosts.allow with a 'deny' option instead.
#
# See 'man 5 hosts_options' and 'man 5 hosts_access'
# for information on rule syntax.
# See 'man tcpd' for information on tcp_wrappers
sshd:*

>>> ssh 192.168.10.10
ssh_exchange_identification: read: Connection reset by peer
允许网段访问 sshd 服务
在允许策略规则文件中添加一条规则,使其放行源自 192.168.10.0/24 网段,访问本机 sshd 服务的所有流量。
>>> vim /etc/host.allow
#
# hosts.allow This file contains access rules which are used to
# allow or deny connections to network services that
# either use the tcp_wrappers library or that have been
# started through a tcp_wrappers-enabled xinetd.
#
# See 'man 5 hosts_options' and 'man 5 hosts_access'
# for information on rule syntax.
# See 'man tcpd' for information on tcp_wrappers
sshd:192.168.10.

>>> ssh 192.168.10.10
The authenticity of host '192.168.10.10 (192.168.10.10)' can't be established.
ECDSA key fingerprint is 70:3b:5d:37:96:7b:2e:a5:28:0d:7e:dc:47:6a:fe:5c.
Are you sure you want to continue connecting (yes/no)? yes
Warning: Permanently added '192.168.10.10' (ECDSA) to the list of known hosts.
root@192.168.10.10's password:
Last login: Wed May 4 07:56:29 2017
使用 ssh 服务管理远程主机
本章记录 nmtui 命令和 nmcli 命令;了解绑定双网卡,实现网络负载均衡。还记录了 SSH 协议与 sshd 服务程序
配置网卡服务
图形界面
图形界面有 mntui 和 nm-connection-editor 两款。注意,在 RHEL7 中,网卡名称为 eno1234
配置网卡参数
通过命令行来配置网卡参数,过程如下:
-
设置好网卡
>>> vim /etc/sysconfig/network-scripts/ifcfg-eno16777736 TYPE=Ethernet # none 表示默认,还有 dhcp 和 static BOOTPROTO=none DEFROUTE=yes IPV4_FAILURE_FATAL=no IPV6INIT=yes IPV6_AUTOCONF=yes IPV6_DEFROUTE=yes IPV6_FAILURE_FATAL=no NAME=eno16777736 UUID=ec77579b-2ced-481f-9c09-f562b321e268 # 关键参数 ONBOOT=yes IPADDR0=192.168.10.10 HWADDR=00:0C:29:C4:A4:09 #NETMASK=255.255.255.0 PREFIX0=24 IPV6_PEERDNS=yes IPV6_PEERROUTES=yes -
重启网卡服务
>>> systemctl restart network
>>> ping -c 4 192.168.10.10
PING 192.168.10.10 (192.168.10.10) 56(84) bytes of data.
64 bytes from 192.168.10.10: icmp_seq=1 ttl=64 time=0.056 ms
64 bytes from 192.168.10.10: icmp_seq=2 ttl=64 time=0.099 ms
64 bytes from 192.168.10.10: icmp_seq=3 ttl=64 time=0.095 ms
64 bytes from 192.168.10.10: icmp_seq=4 ttl=64 time=0.095 ms

--- 192.168.10.10 ping statistics ---
4 packets transmitted, 4 received, 0% packet loss, time 2999ms
rtt min/avg/max/mdev = 0.056/0.086/0.099/0.018 ms
创建网络会话
RHEL7 用 NetworkManager 提供网络服务,它是一种动态管理网络配置的守护进程,能让网络设备保持连接状态。可以使用 nmcli 来管理 NetworkManager 服务。
查看网络状态 nmcli
>>> nmcli connection show
NAME UUID TYPE DEVICE
eno16777736 ec77579b-2ced-481f<Plug>(StopHL)-9c09-f562b321e268 802-3-ethernet eno16777736

>>> nmcli con show eno16777736
connection.id: eno16777736
connection.uuid: ec77579b-2ced-481f-9c09-f562b321e268
connection.interface-name: --
connection.type: 802-3-ethernet
connection.autoconnect: yes
connection.timestamp: 1487348994
... ...
网络会话切换
用户可以在多个配置文件中切换。比如在公司需要用手动指定的网络 IP 地址,而在家中要切换到 DHCP 自动分配 IP 地址,这就可以使用网络会话功能。只需要在不同的环境中激活相应的网络会话,就可以实现网络配置的自动切换。
假设公司环境的会话为 company,家庭网络会话为 house,创建过程如下:
-
指定公司所用网络会话为 company
>>> nmcli connection add con-name company ifname eno16777736 \
autoconnect no type ethernet ip4 192.168.10.10/24 gw4 192.168.10.1
Connection 'company' (86c71220-0057-419e-b615-38f4014cfdee) successfully added.
说明: con-name:指定公司所用网络会话为 company ifname:指定本机网卡名称 autoconnect no:网络会话不会自动激活 ip4 和 gw4:手动指定网络 IP 地址
-
指定家庭网络会话为 house
>>> nmcli connection add con-name house type ethernet ifname eno16777736 Connection 'house' (44acf0a7-07e2-40b4-94ba-69ea973090fb) successfully added. -
查看网络会话
>>> nmcli connection show NAME UUID TYPE DEVICE house 44acf0a7-07e2-40b4-94ba-69ea973090fb 802-3-ethernet -- company 86c71220-0057-419e-b615-38f4014cfdee 802-3-ethernet -- eno16777736 ec77579b-2ced-481f-9c09-f562b321e268 802-3-ethernet eno16777736 -
切换会话
>>> nmcli connection up house
Connection successfully activated (D-Bus active path: /org/freedesktop/NetworkManager/ActiveConnection/2)
绑定两块网卡
网卡绑定可以提高网络传输速度,还可以确保在一场网卡故障时,依然可以正常连网。我们绑定网卡的话,它们会共同传输数据,提升网速也可以避免网络中断。
绑定步骤
-
确保两块网卡是同一网络模式
处于相同模式的网卡设备才可以进行绑定,相互传送数据
-
配置网卡参数
把两块独立的网卡配置成一块从属网卡,服务于主网卡,不应该有自己的 IP 地址
>>> vim /etc/sysconfig/network-scripts/ifcfg-eno16777736 TYPE=Ethernet BOOTPROTO=none ONBOOT=yes USERCTL=no DEVICE=eno16777736 # 绑定后的设备全名为bond0 MASTER=bond0 # 作为从属网卡 SLAVE=yes >>> vim /etc/sysconfig/network-scripts/ifcfg-eno33554968 TYPE=Ethernet BOOTPROTO=none ONBOOT=yes USERCTL=no DEVICE=eno33554968 MASTER=bond0 SLAVE=yes -
配置绑定网卡的参数
>>> vim /etc/sysconfig/network-scripts/ifcfg-bond0 TYPE=Ethernet BOOTPROTO=none ONBOOT=yes USERCTL=no DEVICE=bond0 IPADDR=192.168.10.10 PREFIX=24 DNS=192.168.10.1 NM_CONTROLLED=no -
让 Linux 内核支持网卡绑定驱动
常见的网卡绑定驱动有三种:mode0、mode1 和 mode6,其中:
- mode0:平衡负载模式 两块网卡均工作,且自动备援,但需要在与服务器本地网卡相连的交换机设备上进行端口聚合来支持绑定技术。
- mode1:自动备援模式 一块网卡工作,另一块作热备
- mode6:平衡负载模式 时两块网卡均工作,且自动备援,无须交换机设备提供辅助支持
>>> nvim /etc/modprobe.d/bond.conf # 使 bond0 网卡能支持绑定技术(bonding) alias bond0 bonding # 以mode6模式绑定,故障切换时间100ms options bond0 miimon=100 mode=6 -
重启网络服务
只有 bond0 网卡才会有 IP 地址
>>> systemctl restart network
>>> ifconfig
bond0: flags=5187<UP,BROADCAST,RUNNING,MASTER,MULTICAST> mtu 1500
inet 192.168.10.10 netmask 255.255.255.0 broadcast 192.168.10.255
inet6 fe80::20c:29ff:fe9c:637d prefixlen 64 scopeid 0x20<link>
ether 00:0c:29:9c:63:7d txqueuelen 0 (Ethernet)
RX packets 700 bytes 82899 (80.9 KiB)
RX errors 0 dropped 6 overruns 0 frame 0
TX packets 588 bytes 40260 (39.3 KiB)
TX errors 0 dropped 0 overruns 0 carrier 0 collisions 0

eno16777736: flags=6211<UP,BROADCAST,RUNNING,SLAVE,MULTICAST> mtu 1500
ether 00:0c:29:9c:63:73 txqueuelen 1000 (Ethernet)
RX packets 347 bytes 40112 (39.1 KiB)
RX errors 0 dropped 6 overruns 0 frame 0
TX packets 263 bytes 20682 (20.1 KiB)
TX errors 0 dropped 0 overruns 0 carrier 0 collisions 0

eno33554968: flags=6211<UP,BROADCAST,RUNNING,SLAVE,MULTICAST> mtu 1500
ether 00:0c:29:9c:63:7d txqueuelen 1000 (Ethernet)
RX packets 353 bytes 42787 (41.7 KiB)
RX errors 0 dropped 0 overruns 0 frame 0
TX packets 325 bytes 19578 (19.1 KiB)
TX errors 0 dropped 0 overruns 0 carrier 0 collisions 0
当我们拔出一块网卡时,可以看到网卡切换过程
>>> ping 192.168.10.10
ping 192.168.10.10
PING 192.168.10.10 (192.168.10.10) 56(84) bytes of data.
64 bytes from 192.168.10.10: icmp_seq=1 ttl=64 time=0.109 ms
64 bytes from 192.168.10.10: icmp_seq=2 ttl=64 time=0.102 ms
64 bytes from 192.168.10.10: icmp_seq=3 ttl=64 time=0.066 ms
ping: sendmsg: Network is unreachable
64 bytes from 192.168.10.10: icmp_seq=5 ttl=64 time=0.065 ms
64 bytes from 192.168.10.10: icmp_seq=6 ttl=64 time=0.048 ms
远程控制服务
配置 sshd 服务
SSH (Secure Shell) 是一种以安全方式提供远程登录的协议。之前采用的是 FTP 或 Telnet 登录,但它们以明文形式传输帐户和密码,很不安全。
我们需要先部署 sshd 服务,它是一款远程管理服务程序,有两种安全的验证方法:
- 基于口令的验证
-
基于密钥的验证
要在本地生成密钥对,把公钥上传至服务器。
sshd 服务的配置信息保存在 /etc/ssh/sshd_config 中。我们把保存的最主要配置信息的文件称为主配置文件,ssh 服务配置文件的主要参数如下:
sshd 参数
| 参数 | 作用 |
|---|---|
Port 22 |
默认的 sshd 服务端口 |
ListenAddress 0.0.0.0 |
设定 sshd 服务器监听的 IP 地址 |
Protocol 2 |
SSH 协议的版本号 |
HostKey /tc/ssh/ssh_host_key |
SSH 协议版本为 1 时,DES 私钥存放的位置 |
HostKey /etc/ssh/ssh_host_rsa_key |
SSH 协议版本为 2 时,RSA 私钥存放的位置 |
HostKey /etc/ssh/ssh_host_dsa_key |
SSH 协议版本为 2 时,DSA 私钥存放的位置 |
PermitRootLogin yes |
设定是否允许 root 管理员直接登录 |
StrictModes yes |
当远程用户的私钥改变时直接拒绝连接 |
MaxAuthTries 6 |
最大密码尝试次数 |
MaxSessions 10 |
最大终端数 |
PasswordAuthentication yes |
是否允许密码验证 |
PermitEmptyPasswords no |
是否允许空密码登录(很不安全) |
禁止以 root 身份登录
-
修改配置文件
>>> vim /etc/ssh/sshd_config ………………省略部分输出信息……………… 46 47 #LoginGraceTime 2m # 把此行改为 no 48 PermitRootLogin no 49 #StrictModes yes 50 #MaxAuthTries 6 51 #MaxSessions 10 52 ………………省略部分输出信息……………… -
重启服务程序
>>> systemctl restart sshd >>> systemctl enable sshd -
再以 root 身份登录
>>> ssh 192.168.10.10
root@192.168.10.10's password:此处输入远程主机root用户的密码
Permission denied, please try again.
安全密钥验证
密钥分成私钥和公钥。在传输前先使用公钥对数据加密,然后再传输。只有掌握私钥的用户才能解密这段数据。具有过程如下:
-
在客户端生成密钥对
>>> ssh-keygen Generating public/private rsa key pair. Enter file in which to save the key (/root/.ssh/id_rsa):按回车键或设置密钥的存储路径 Created directory '/root/.ssh'. Enter passphrase (empty for no passphrase):直接按回车键或设置密钥的密码 Enter same passphrase again:再次按回车键或设置密钥的密码 Your identification has been saved in /root/.ssh/id_rsa. Your public key has been saved in /root/.ssh/id_rsa.pub. ... ... -
把公钥传送至远程主机
>>> ssh-copy-id 192.168.10.10 The authenticity of host '192.168.10.20 (192.168.10.10)' can't be established. ECDSA key fingerprint is 4f:a7:91:9e:8d:6f:b9:48:02:32:61:95:48:ed:1e:3f. Are you sure you want to continue connecting (yes/no)? yes /usr/bin/ssh-copy-id: INFO: attempting to log in with the new key(s), to filter out any that are already installed /usr/bin/ssh-copy-id: INFO: 1 key(s) remain to be installed -- if you are prompted now it is to install the new keys root@192.168.10.10's password:此处输入远程服务器密码 Number of key(s) added: 1 Now try logging into the machine, with: "ssh '192.168.10.10'" and check to make sure that only the key(s) you wanted were added. -
设置服务器只允许密钥验证,拒绝口令验证
>>> vim /etc/ssh/sshd_config 74 75 # To disable tunneled clear text passwords, change to no here! 76 #PasswordAuthentication yes 77 #PermitEmptyPasswords no 78 PasswordAuthentication no 79 >>> systemctl restart ssh -
在客户端登录
>>> ssh 192.168.10.10
Last login: Mon Apr 13 19:34:13 2017
远程传输命令
scp (secure copy) 是基于 ssh 协议的传输命令,格式为 scp [参数] 本地文件 远程账户@远程IP地址:远程目录
scp 参数
| 参数 | 作用 |
|---|---|
| -v | 显示详细的连接进度 |
| -P | 指定远程主机的 sshd 端口号 |
| -r | 用于传送文件夹 |
| -6 | 使用 IPv6 协议 |
注意: scp 本地文件的位置要以绝对路径写明,
-r传输整个文件夹
scp 传输文件
>>> echo "Welcome to LinuxProbe.Com" > readme.txt
>>> scp /root/readme.txt  192.168.10.20:/home
root@192.168.10.20's password:此处输入远程服务器中root管理员的密码
readme.txt 100% 26 0.0KB/s 00:00
scp 下载文件
格式:scp [参数] 远程用户@远程IP地址:远程文件 本地目录
>>> scp 192.168.10.20:/etc/redhat-release /root
root@192.168.10.20's password:此处输入远程服务器中root管理员的密码
redhat-release 100% 52 0.1KB/s 00:00
不间断会话服务
当我们与远程主机会话关闭后,在远程主机上的命令也会随之关闭,为了避免这一问题,我们可以使用 screen 或 tmux 软件。这里不过多说明,可以看 tmux 章节
SELinux 安全子系统
SELinux 服务的主配置文件中,定义的是 SELinux 的默认运行状态,可以将其理解为系统重启后的状态,因此它不会在更改后立即生效。可以使用 getenforce 命令获得当前 SELinux 服务的运行模式:
>>> getenforce
Enforcing
| 用 setenforce [0 | 1]命令修改 SELinux 当前的运行模式(0 为禁用,1 为启用)。注意,这种修改只是临时的,在系统重启后就会失效 |
>>> setenforce 0
>>> getenforce
Permissive
因为 httpd 服务允许用户访问网站内容,SELinux 会放行用户对网站的请求操作。但网站数据修改为 /home/wwwroot,这是普通用户的目录,httpd 网站服务要获取普通用户数据,违反了 SELinux 的监管原则。
把 SELinux 服务恢复到强制安全策略模式,然后再查看原始网站数据的保存目录与当前网站数据的保存目录是否拥有不同的 SELinux 安全上下文:
>>> setenforce 1
>>> ls -Zd /var/www/html
drwxr-xr-x. root root system_u:object_r:httpd_sys_content_t:s0 /var/www/html

>>> ls -Zd /home/wwwroot
drwxrwxrwx. root root unconfined_u:object_r:home_root_t:s0 /home/wwwroot
SELinux 安全上下文由用户段、角色段以及类型段等多个信息项共同组成。
| 信息项 | 功能 |
|---|---|
system_u |
用户段,代表系统进程的身份 |
object_r |
角色段,代表文件目录的角色 |
httpd_sys_content_t |
类型段,代表网站服务的系统文件 |
通过命令 semanage,把当前网站目录 /home/wwwroot 的 SELinux 安全上下文改为原始网站目录一致即可
semange 命令
semange 是管理 SELinux 策略的命令,格式为:semange [选项] [文件]
semange 参数
| 参数 | 功能 |
|---|---|
-l |
查询 |
-a |
添加 |
-m |
修改 |
-d |
删除 |
示例
让目录中所有文件可被 httpd 服务访问
>>> semange fcontext -a -t httpd_sys_content_t /home/wwwroot
>>> semange fcontext -a -t httpd_sys_content_t /home/wwwroot/*
# 将设置好的SELinux安全上下文生效 -Rv 对目录递归
>>> restorecon -Rv /home/wwwroot/
restorecon reset /home/wwwroot context unconfined_u:object_r:home_root_t:s0->unconfined_u:object_r:httpd_sys_content_t:s0
restorecon reset /home/wwwroot/index.html context unconfined_u:object_r:home_root_t:s0->unconfined_u:object_r:httpd_sys_content_t:s0
日常工作中要养成将所需服务添加到开机启动项中的习惯,比如这里就需要添加 systemctl enable httpd 命令
个人用户主页功能
为每位用户建立一个独立的网站,方法是基于虚拟网站主机功能来部署多个网站。但用户过多的话,配置过于繁杂。好方法是利用 httpd 服务程序提供的个人用户主页功能。该功能可以让系统内所有的用户在自己的家目录中管理个人的网站,而且访问起来也非常容易。
配置步骤
-
开启个人用户主页功能
- 在 17 行
UserDir disabled注释掉 - 24 行,打开
UserDir public_html
UserDir 表示网站数据在用户 home 中的保存目录名称,即
public_html>>> vim /etc/httpd/conf.d/userdir.conf 1 # 2 # UserDir: The name of the directory that is appended onto a user's home 3 # directory if a ~user request is received. 4 # 5 # The path to the end user account 'public_html' directory must be 6 # accessible to the webserver userid. This usually means that ~userid 7 # must have permissions of 711, ~userid/public_html must have permissions 8 # of 755, and documents contained therein must be world-readable. 9 # Otherwise, the client will only receive a "403 Forbidden" message. 10 # 11 <IfModule mod_userdir.c> 12 # 13 # UserDir is disabled by default since it can confirm the presence 14 # of a username on the system (depending on home directory 15 # permissions). 16 # 17 # UserDir disabled 18 19 # 20 # To enable requests to /~user/ to serve the user's public_html 21 # directory, remove the "UserDir disabled" line above, and uncomment 22 # the following line instead: 23 # 24 UserDir public_html 25 </IfModule> 26 27 # 28 # Control access to UserDir directories. The following is an example 29 # for a site where these directories are restricted to read-only. 30 # 31 <Directory "/home/*/public_html"> 32 AllowOverride FileInfo AuthConfig Limit Indexes 33 Options MultiViews Indexes SymLinksIfOwnerMatch IncludesNoExec 34 Require method GET POST OPTIONS 35 </Directory> - 在 17 行
-
建立网站数据目录及首页文件
>>> su - wilson Last login: Fri May 22 13:17:37 CST 2017 on :0 >>> mkdir public_html >>> echo "这是wilson的网站" > public_html/index.html # 保证其他人有权限读取里面内容 >>> chmod -Rf 755 /home/wilson -
重启 httpd 服务,输入网站地址
127.0.01/~wilson“网址/~用户名”(其中的波浪号是必需的,而且网址、波浪号、用户名之间没有空格)
但结果为:
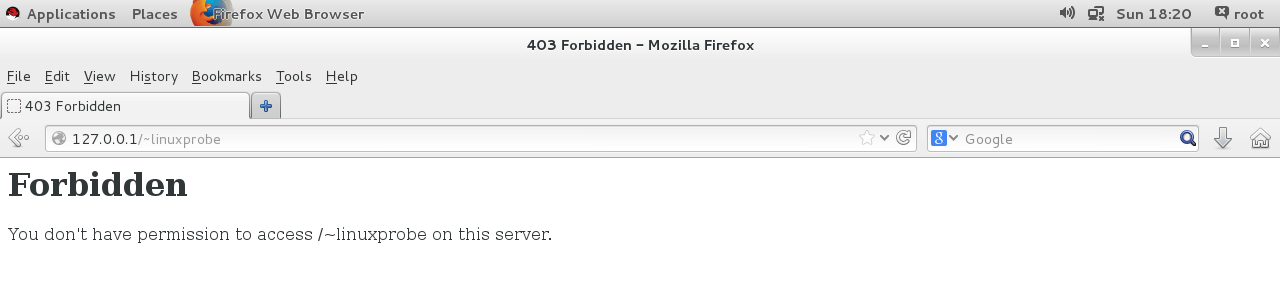
原因分析:
- httpd 服务提供的个人主页功能,用户的网站数据就应该存放用户家目录,所以不需要修改家目录的 SELinux 安全上下文
- SELinux 域确保服务程序不能执行违规的操作,httpd 服务中开启的这项个人用户主页功能没有被 SELinux 域允许
用 getsebool 查询与 http 相关的安全策略:
>>> getsebool -a | grep http httpd_anon_write --> off httpd_builtin_scripting --> on httpd_can_check_spam --> off httpd_can_connect_ftp --> off httpd_can_connect_ldap --> off httpd_can_connect_mythtv --> off httpd_can_connect_zabbix --> off ... ... # 与个人主页功能有关的SELinux域安全策略 httpd_enable_homedirs --> off ... ... httpd_use_gpg --> off httpd_use_nfs --> off httpd_use_openstack --> off httpd_use_sasl --> off httpd_verify_dns --> off named_tcp_bind_http_port --> off prosody_bind_http_port --> off -
设置 SELinux 域安全策略
>>> setsebool -P httpd_enable_homedirs=on >>> firefox-P参数让 SELinux 策略永久生效同时立即生效正常显示网页:

网站中添加口令功能
-
使用 htpasswd 生成密码数据库
>>> htpasswd -c /etc/httpd/passwd wilson New password:此处输入用于网页验证的密码 Re-type new password:再输入一遍进行确认 Adding password for user wilson-c:表示第一次生成 后面:密码数据库保存到的文件 验证要用到的用户名(不必是已有的本地帐户) -
修改个人用户主页功能
>>> vim /etc/httpd/conf.d/userdir.conf
27 #
28 # Control access to UserDir directories. The following is an example
29 # for a site where these directories are restricted to read-only.
30 #
31 <Directory "/home/*/public_html">
32 AllowOverride all

#刚刚生成出来的密码验证文件保存路径
33 authuserfile "/etc/httpd/passwd" #当用户尝试访问个人用户网站时的提示信息
34 authname "My privately website"
35 authtype basic #用户进行账户密码登录时需要验证的用户名称
36 require user linuxprobe
37 </Directory> >>> systemctl restart httpd
此后,当用户再想访问某个用户的个人网站时,就必须要输入账户和密码才能正常访问了。另外,验证时使用的账户和密码是用 htpasswd 命令生成的专门用于网站登录的口令密码,而不是系统中的用户密码
虚拟网站主机功能
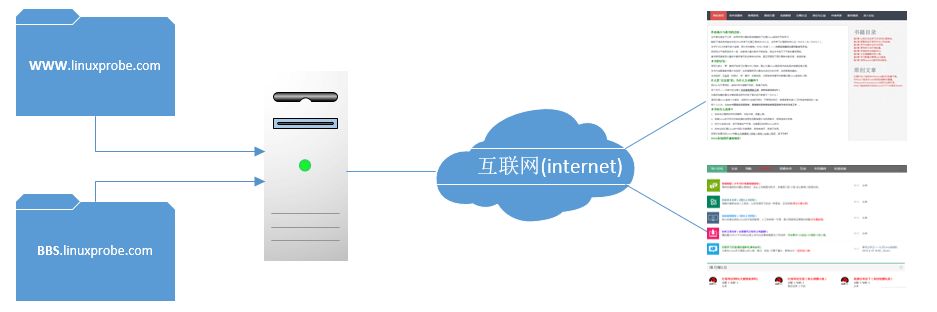
在虚拟专用服务器(Virtual Private Server,VPS)与云计算技术诞生以前,IDC 服务供应商为了能够更充分地利用服务器资源,启用了虚拟主机功能。把一台处于运行状态的物理服务器分割成多个“虚拟的服务器”。但是,该技术无法实现目前云主机技术的硬件资源隔离。
Apache 的虚拟主机功能是服务器基于用户请求的不同 IP 地址、主机域名或端口号,实现多个网站同时为外部提供访问服务的技术,如图所示,用户请求的资源不同,最终获取到的网页内容也各不相同。
基于 IP 地址
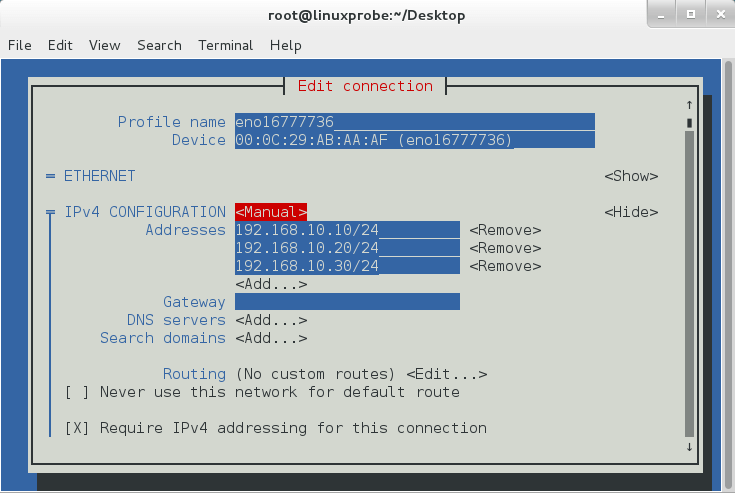
如果一台服务器有多个 IP 地址,而且每个 IP 地址对应于服务器上部署的一个网站,这样当用户请求访问不同的 IP 地址时,会访问到不同网站的页面资源。现在假设有 3 张网卡,通过 nmtui 配置如下:
-
创建 3 个网站目录
在
/home/wwwroot中创建保存不同网站数据的 3 个目录,并向其中分别写入网站的首页文件>>> systemctl restart network >>># mkdir -p /home/wwwroot/10 >>># mkdir -p /home/wwwroot/20 >>># mkdir -p /home/wwwroot/30 >>># echo "IP:192.168.10.10" > /home/wwwroot/10/index.html >>># echo "IP:192.168.10.20" > /home/wwwroot/20/index.html >>># echo "IP:192.168.10.30" > /home/wwwroot/30/index.html -
追加 3 个虚拟主机网站参数
>>> vim /etc/httpd/conf/httpd.conf ………………省略部分输出信息……………… 113 <VirtualHost 192.168.10.10> 114 DocumentRoot /home/wwwroot/10 115 ServerName www.wilson.com 116 <Directory /home/wwwroot/10 > 117 AllowOverride None 118 Require all granted 119 </Directory> 120 </VirtualHost> 121 <VirtualHost 192.168.10.20> 122 DocumentRoot /home/wwwroot/20 123 ServerName bbs.linuxprobe.com 124 <Directory /home/wwwroot/20 > 125 AllowOverride None 126 Require all granted 127 </Directory> 128 </VirtualHost> 129 <VirtualHost 192.168.10.30> 130 DocumentRoot /home/wwwroot/30 131 ServerName tech.linuxprobe.com 132 <Directory /home/wwwroot/30 > 133 AllowOverride None 134 Require all granted 135 </Directory> 136 </VirtualHost> ………………省略部分输出信息……………… >>> systemctl restart httpd -
设置 SELinux
由于当前的
/home/wwwroot目录及里面的网站数据目录的 SELinux 安全上下文与网站服务不符,所以 httpd 服务无法取到网站数据目录。>>> semange fcontext -a -t httpd_sys_content_t /home/wwwroot >>> semange fcontext -a -t httpd_sys_content_t /home/wwwroot/10 >>> semange fcontext -a -t httpd_sys_content_t /home/wwwroot/10/* >>> semange fcontext -a -t httpd_sys_content_t /home/wwwroot/20 >>> semange fcontext -a -t httpd_sys_content_t /home/wwwroot/20/* >>> semange fcontext -a -t httpd_sys_content_t /home/wwwroot/30 >>> semange fcontext -a -t httpd_sys_content_t /home/wwwroot/30/* >>> restorecon -Rv /home/wwwroot restorecon reset /home/wwwroot context unconfined_u:object_r:home_root_t:s0->unconfined_u:object_r:httpd_sys_content_t:s0 restorecon reset /home/wwwroot/10 context unconfined_u:object_r:home_root_t:s0->unconfined_u:object_r:httpd_sys_content_t:s0 restorecon reset /home/wwwroot/10/index.html context unconfined_u:object_r:home_root_t:s0->unconfined_u:object_r:httpd_sys_content_t:s0 >>> firefox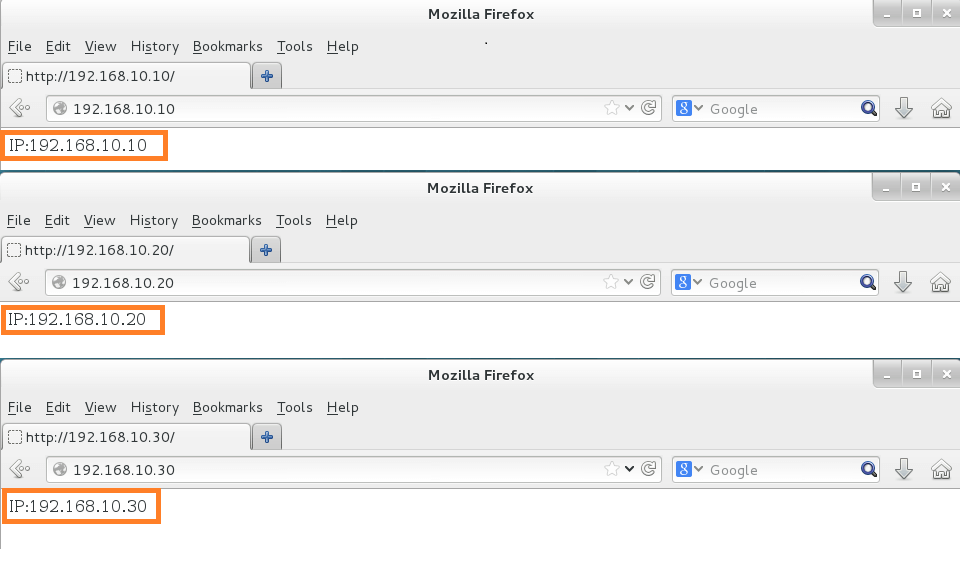
基于主机域名
当服务器无法为每个网站都分配一个独立 IP 地址的时候,可以尝试让 Apache 自动识别用户请求的域名,从而根据不同的域名请求来传输不同的内容。现假定生产环境服务器 IP 地址为:192.168.10.10,再手工定义 IP 与域名之间的对应关系。/etc/hosts是 Linux 系统中强制把主机域名解析到指定 IP 地址的配置文件。只要有这个配置文件,即使网卡参数中没有 DNS 信息也依然可以将域名解析为某个 IP 地址。
-
手工定义 IP 与域名
>>> vim /etc/hosts 127.0.0.1 localhost localhost.localdomain localhost4 localhost4.localdomain4 ::1 localhost localhost.localdomain localhost6 localhost6.localdomain6 192.168.10.10 www.wilson.com bbs.wilson.com tech.wilson.com >>> ping -c 4 www.wilson.com PING www.linuxprobe.com (192.168.10.10) 56(84) bytes of data. 64 bytes from www.linuxprobe.com (192.168.10.10): icmp_seq=1 ttl=64 time=0.070 ms 64 bytes from www.linuxprobe.com (192.168.10.10): icmp_seq=2 ttl=64 time=0.077 ms 64 bytes from www.linuxprobe.com (192.168.10.10): icmp_seq=3 ttl=64 time=0.061 ms 64 bytes from www.linuxprobe.com (192.168.10.10): icmp_seq=4 ttl=64 time=0.069 ms --- www.linuxprobe.com ping statistics --- 4 packets transmitted, 4 received, 0% packet loss, time 2999ms rtt min/avg/max/mdev = 0.061/0.069/0.077/0.008 ms -
在
/home/wwwroot中创建三个目录>>> mkdir -p /home/wwwroot/www >>> mkdir -p /home/wwwroot/bbs >>> mkdir -p /home/wwwroot/tech >>> echo "www.wilson.com" > /home/wwwroot/www/index.html >>> echo "bbs.wilson.com" > /home/wwwroot/bbs/index.html >>> echo "tech.wilson.com" > /home/wwwroot/tech/index.html -
在 httpd 服务配置文件中写入参数
>>> vim /etc/httpd/conf/httpd.conf